Before the advent of today’s high-tech epoxy resins and refinishing compounds, a crack in a porcelain fixture usually spelled the end for the fixture. Nowadays however, many new products are available that allow the do-it-yourselfer to achieve professional repair results.
Porcelain Repairs For Toilet Bowls, Toilet Tanks, & Sinks
Step 1: Evaluate.
Be sure that the fixture you wish to repair is a candidate for repair. Some fixtures that appear to have only minor damage may not be feasibly repaired while others that are nearly shattered or even have missing pieces can be perfectly restored. The tank at right is an example of one that probably cannot be repaired. The crack in the circled area is stained blue with dye from one of those “blue water” bowl cleaner drop-ins. Though it is not visible in this photo, the entire bottom of the tank is criss-crossed with blue capillary-like veining. This type of crazing is common in some old tanks and generally cannot be repaired as the whole tank “sweats” water through the bottom continuously.

Age Crackle & Crazing
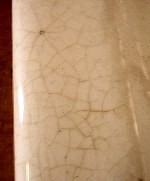
Crackle and crazing are related problems. In the early days of sanitaryware manufacture, American potters lacked the closely held technical knowledge of their French and British counterparts. As a result, some early American sanitaryware was made from an inferior blend containing cement. As cement products cure, they shrink. If the shrinkage is uniform and slow enough, it produces age-crackle like that shown at left. This has actually become a much sought-after look in period fixtures and should be left alone if the finish crackle is tight. Crazing occurs when the shrinkage happens so rapidly, it compromises the structure of the fixture as has happened to the tank in the photo above. Generally speaking, a crackle look in a sink should be spot repaired to preserve the crackle or the whole fixture should be refinished. Crackled toilet tanks are probably better off being replaced.
Repairable Cracks

Cracks that run in a well defined line without numerous intersecting cracks are good candidates for do-it-yourself repair. Most cracks in older fixtures are the result of shrinkage or stresses from firing in the kiln, not impacts or abuse.
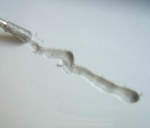
The photo at left shows a compound crack indicating impact or freeze damage. This type of crack though repairable, may indicate a serious structural flaw in the fixture, including possible hidden damage. Consideration should be given to the use of the fixture before repairing this type of crack, especially if it looks like the structure of the fixture is compromised.
Crack Repair 101
Tools Required:
- High speed rotary Dremel-type tool (Available at any hardware store).
- Diamond encrusted Dremel rotary grinder bit (Available at larger hardware stores and hobby stores).
- A cone or ball-shaped bit about 1/8″ in diameter is best.
- Industrial White Epoxy Paste
- Sandpaper, assorted grits 60 to 600.
- Surface Repair Refinishing Spray
- Safety goggles, a wet sponge, & steady hands.

Procedure:
- Clean the area around the crack to expose the full extent of the damage.
- At the farthest visible extent of the crack, use the dremel tool & diamond bit to drill a hole completely through the porcelain. Use the wet sponge to dribble water on to the work area to keep the bit cool and to control dust. Drilling through the porcelain at this point “drill stops” the crack to prevent it from spreading further.
- Grind out a V or U-shaped valley along the entire length of the crack approximately 1/8″ deep x 1/8″ wide. This will remove any dirt and give the epoxy a maximum amount of surface to bond with.
- Mix epoxy according to instructions and fill the crack. Use a popsicle stick to smooth the surface to just slightly above grade. If the repair is on a vertical surface, fill the groove and apply a piece of clear packing tape over the repair to hold the epoxy in place while it cures.
- Once the epoxy is fully cured, start with the coarsest grit sandpaper and sand the repair down to grade, using progressively finer grits until the surface of the repair is flush and smooth. If any air bubbles are exposed or the repair needs to built back up to grade, go back to step 4 using another thinner layer of epoxy.
- If the repair is in an inconspicuous place, you may opt to stop at this point, especially if a white epoxy is used. Sanding with very fine grit (1000 grit) sandpaper can make for a perfectly acceptable repair in many cases.
- If a fully refinished surface is desired, wipe the area down with acetone and let dry. Spray on an even coat of white surface repair refinishing spray and allow to dry to a light tack. Within 10 minutes, spray on an even coat of clear surface repair spray to “gloss” and seal the surface. You may wish to refinish the entire fixture or you can allow overspray from the repair area to drift a bit to help blend in and hide the repaired area.